Monthly Archives: July 2017

DIY tile removal

Why DIY Tile Removal is Always a Bad Idea

How Hard Can It Be?

This is always the question that a do-it-yourselfer asks themselves before taking on a home renovation project. Normally, DIY projects are reserved for simple tasks that would save money, time and trouble. There are some renovation projects that someone with even a little bit of experience and an internet connection can manage to do on their own. But is a DIY tile removal project one of them? The short answer is no, and here’s why.

What DIY Tile Removal Really Entails

You wouldn’t think so, but removing floor tile is actually an incredibly difficult and insanely time-consuming process. The major issues, though, are the ones you don’t know about until the project actually starts. Depending on the construction of your home, the tile could be attached to anything from cement to mason board underlayment. So, what exactly does this mean?

It means that whatever is beneath the surface will determine how long the project will take and how hard the tiles are to remove. You’re not just popping tiles out and setting them aside to reveal a smooth, ready-for-renovations floor underneath. Floor tile removal involves a lot of chiseling, breaking, hauling, dusting, and aching— plus the added risk of damaging both the underlayment and the subfloor.

The If’s and When’s of DIY

There’s no easy DIY tile removal process, and there’s no one way of removing tile.

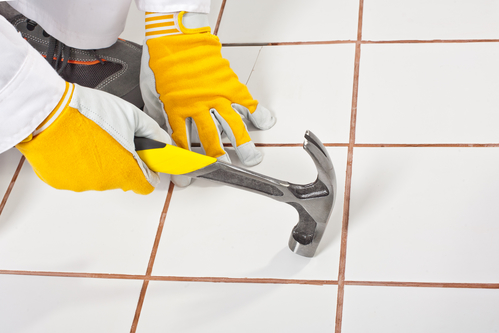
If your floor is concrete, removing tiles requires literally knocking them up and breaking up the adhesive with hammers and chisels. Without experience or the right tools for the job, you can easily hurt yourself or damage your floor trying the DIY method.

When the underlayment is removed with the tiles, you’ll need to either pry out or hammer in any exposed nails you come across. Failing to do so not only makes later installation challenging but is also a huge working hazard. Hopefully, you’ll have found any exposed nails by looking for them instead of stepping on them.

If you don’t know what you’re doing, you might jeopardize the integrity of your floor by missing a big issue. For example, treating rotten wood or replacing divots in the concrete is necessary to keep the foundation smooth and even when the new flooring gets installed. An inexperienced DIYer might miss this and end up laying a new floor over an unsafe foundation.

When all is said and done, there’s always going to be a huge mess to clean up. The room is going to be filled with broken tiles and coated with hearty amounts of dust. Clean-up time will be about the same— if not more— than the actual removal tile process.

The (Literal) Weight of the Work

Everything listed above would be too much for even the most determined DIYers, but one major part of floor tile renovation projects that most people fail to take into account is the actual removal of the ripped-up tiles from the premises. Transporting the remains of what used to be your tile is just as time-consuming as the process of breaking them up. Despite what you might think going into the project, the garbage collectors aren’t going to take the broken tiles away for you. The remnants of most home renovation projects require a special kind of removal that can’t be covered by just hauling it to the dump. Remember, landfill dumping costs are based on weight, and that’s an extra expense for the DIYers.

Why DIY is Expensive

The main reason anyone attempts DIY tile removal in the first place is to cut back on renovation costs, but this is counterintuitive for a number of reasons. As previously stated, the DIYer is going to need access to certain things for a successful DIY tile removal, like the tools for removing the tile, the tools for the cleanup, and the means of taking the ripped-up tile to a proper disposal site. This, coupled with the likelihood of needing professional help anyway to fix your inevitable mistakes, makes DIY tile removal more trouble than it’s worth. You’re better off using a professional tile removal service. You’ll save time, money, and a whole lot of aches and pains.

Do Better Than DIY Tile Removal with Dustbusters

Tile removal takes time, hard work and a certain amount of expertise that keeps the project on track without risking damage or costly do-overs. At Dustbusters, our renovation specialists can handle your floor tile removal, cleanup, and disposal for you, all with minimal dust and mess. If you have any questions about our process or what to expect, give us a call at 866-883-8783.

Choosing the Best Flooring Options for your Home

Choosing the Best Flooring Options for your Home

If you are in the middle of a redesign or your floors are just simply outdated, you’ll need to choose new flooring. But, what are the best flooring options for your home? There are undoubtedly a few things you will need to consider before making a decision to protect your investment. After all, you want the flooring that you choose to look great, last long, and suit all of your needs!

What to Consider before Choosing your Best Flooring Options

Flooring Intention: What is the intention of your flooring? For example, if you need flooring that you know will get wet often, you may want to stay away from choosing hardwood flooring. Or, do you need new flooring in a high traffic area? You may wish to choose a material that is resistant to scratches. Each room of your house has a purpose, and the flooring in each room shouldn’t deter the room from providing its purpose.

Home Needs: Obviously, one of the main concerns you should have when choosing new flooring is your own needs. Do you have pets? You may wish to choose flooring which will prevent scratches. Do you have small children? Consider softer carpets. Do you have allergies? You may wish to go with a flooring option that is easier to clean like wood or tile. Whatever your needs as a family or individual, consider these before you make your final choice.

Upkeep: Different rooms of your home get dirty for various reasons. Make sure that the flooring that you choose for a room suits your maintenance schedule. For example, if you like to mop your kitchen floors to keep sanitary, choosing wood floors isn’t the best option because they do not do well with moisture. Keep in mind your cleaning style and needs before choosing the flooring in each room of your home.

Aesthetics: Of course, you want the flooring to look great. Also, you want the flooring that you choose to look good with another flooring in the house. If you have carpet in the bedroom but you are redoing the area outside the room, choose a flooring option that looks good next to the carpet. Additionally, make sure that you choose a flooring option appropriate for spacing. For example, in a bathroom, carpet can hold bacteria and water unfit for safety. Although it was acceptable in houses 30 years ago, it’s just simply an eyesore to have carpet in a bathroom today. Instead, go with a flooring that pairs well with the rest of the home’s floors.

Flooring Options to Choose From

Carpet: Great for bedrooms and child rooms, carpet provides both a soft look and touch. Different selections can provide you with texture, length, and color. But, carpet can be hard to maintain as it soaks up liquid and stains easily.

Wood: Natural wood is arguably the most beautiful type of flooring option. But, it definitely has its drawbacks. Being of wood, naturally, it does not do well with liquid or any kind of moisture. So, maintenance is restricted to dusting and sweeping.

Laminate: A great option to wood flooring, laminate doesn’t damage when cleaned with water. Also, it is a cheaper option that wood. Providing a number of colors and styles, this option is a beautiful one. The downside is that it may not last as long as real wood flooring or be as stunning.

Tile: The most resilient of your flooring options, tile comes in many different styles, shapes, patterns, colors, and even materials. It is completely waterproof, so it’s best for areas like bathrooms and laundry rooms. But, grout and tile may show dirt quicker and be harder to clean than other flooring solutions.

Selected from the Best Flooring Options?

If you are looking to redo flooring, make the process easier and faster by hiring a floor removal service. Dustbusters can save you time and energy by removing you flooring in a single day with our dust-free system. This means that there is absolutely no clean up for you after we finish! If you are interested in seeing how we can remove your floors in a clean, fast, and healthy way, please visit our website or give us a call at 866-883-8783.

mold under linoleum

Safely Getting Rid of Mold Under Linoleum Flooring

Certain types of materials, like linoleum, are susceptible to mold infestations. Linoleum is a very sturdy material, however, if it isn’t regularly cleaned and sealed formations begin to take hold. It’s important to clean and remove mold under linoleum flooring as soon as you notice it. Otherwise, infestations can cause serious health hazards for anyone living in the building.

Most Common Types of Mold

Different types of mold can grow on a number of surfaces. The three most common types of mold found in homes are Aspergillus, Cladosporium, and Stachybotrys. Aspergillus is a mold commonly found in foods and in AC units. Cladosporium typically grows in air ducts and bathrooms. These types of mold can cause minor allergic reactions in humans and animals. Stachybotrys, also known as “black mold”, is commonly found on carpet, linoleum, insulation, drywall and other surfaces. In small amounts, mold exposure isn’t regarded as a health issue. However, if mold growth continues unmanaged the results could be harmful to you and your family. This is why it is vital that individuals clean their homes and attempt to remove any mold under linoleum.

Harmful Effects of Mold Under Linoleum

Having mold in your home can be very dangerous for anyone living under your roof, especially small children and the elderly. Mold can get into an individual’s lungs or mouth, causing the individual to have an allergic reaction. Here are some of the short-term effects of mold:

➢ Trouble breathing
➢ Nasal congestion

➢ Nose bleeding

➢ Headache

➢ Upper Respiratory tract infection

➢ Eye irritation

➢ Rashes

➢ Sore throat

After long exposure to heavy amounts of mold, serious and even deadly side effects can develop. Here are some of the long-term effects:

➢ Cancer
➢ Acute idiopathic pulmonary hemorrhage

➢ Hypersensitivity pneumonitis fibrosis

➢ Neurotoxicity

➢ Cardiac conditions

These effects can be disastrous to expectant mothers, the elderly and young children. If you are concerned for your health after exposure to large amounts of mold, please consult your doctor.

Removing Mold Under Linoleum

Removing mold from your home or building can be a very costly project depending on how bad the infestation is. If mold has just started to grow in your home, then you can still save yourself the expense by cleaning and taking precautions. Here’s a step-by-step process of what to do:

Step 1. Remove any sources of moisture in the infested area. The EPA even states that the best way to control mold growth is to remove moisture buildup in the building. If there is water damage in your home, then you will need to fix the damage to get rid of the mold.

Step 2. Seal off the rest of them home. HGTV recommends the use of heavy plastic to seal off doorways and entrances leading to the room with the infestation. You need to do this to stop the mold from spreading to the rest of the home. Use duct tape to secure the heavy plastic on the doorways and entrances.

Step 3. Get up and Suit up. For the next step, you’ll have to put on a few things to protect you from the mold. Put on a facemask or respirator. You’ll also want to put on protective clothing, which will prevent mold spores from landing on your body. This means covering your head, legs, and arms. Make sure you are thoroughly protected before moving on to the next step.

Step 4. Cleanup on Aisle 4. Grab a sponge and some heavy-duty soap to clean any mold you can see. Then use mold removal products found at your local hardware store. These commercial products will be sure to kill off any mold it comes in contact with. Be sure to clean the surrounding areas, because they may have mold infestations that aren’t visible yet. After you are done, you’ll want to put all of the materials you used in the garbage. Don’t reuse any of the protective clothing or sponges.

Getting Rid of Linoleum

Locating and cleaning mold under linoleum is no easy task. Sometimes the infestation of mold under linoleum is so severe that you have to get rid of the entire floor. If that’s the case, then give us a call at 866-883-8783. We get rid of any harmful residues, chemicals or even molds in the buildings we clean. Our team at DustBusters is committed to safely removing and cleaning floors in an efficient manner.